The finished product.
Saturday, March 28, 2009
Progress
This post will explain the process of created the stop motion animation "Embedded Belonging". Over the past few days I was not able to post as I was too busy actually creating the video, so this will explain the process from Wednesday 25th March - Friday 27th March (and also last Saturday, discussing my preliminary thoughts to compare with the final outcome). Appologies for low quality photos as they had to be taken with my iPhone (as my actual digital camera was on its tripod for taking photos for the video and could not be touched).
Saturday 21st March 2009
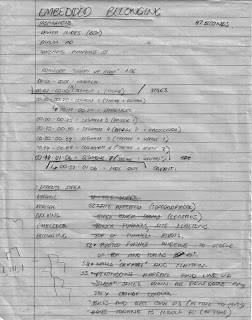
 These were notes I wrote last Saturday and were the original notes made for the idea of the assignment. As you can see from the notes, the first thing I did in the process was to listen to the piece of music to help me structure my ideas. By listening the music and breaking it down into "segments", I was able to structure my thoughts into segments as well.
 These notes were written on the Wednesday to try and structure exactly how I was going to go about creating the video. It was a test of logic for me to think about explactly how many slides would need to be cut in order to do what I wanted. As these notes show, I originally estimated I would need to cut a lot more slides than I did, due to not thinking creatively enough, at the time, about how I would photograph the frames. It was at this point I decided to abandon the use of colour in the video. With the number of slides I was estimating, the workload was unrealistic, and something I could afford to compromise with.
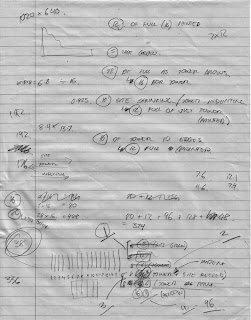
 When creating a "segment" I break them down into 4 parts. Each part is the melody of "Happy Up Here" (The song of my video, click here to see the video) played once. From this, I could sync the video in time with the music with very little effort. When planning the difficult Segment 7, I had to plan when each part of the segment would be shown in relation to each other. Segment 7 spanned 10 slides, but not all at once, so these diagrams in these notes helped me ground myself with what I was actually creating. The diagram in the top right was especially helpful in reminding me what I labelled as what and in which sequence they are shown.
 This was the vector I started to create (for Segment 7) on the evening of Wednesday for the Laser Cutting we had booked for Thursday. Originally (and as can be seen from my storyboard and notes [above]), my idea was to have ornate, asymmetrical flames that would evolve into a tower while licking at the air. I started trying to create this in Illustrator, but realised that such asymmetry would not only take an incredibly long time to do well, but also, may jar with the rest of the video, as symmetry is something that has always been present. I did want the sequence (which was Segment 7) to stand out, but it still needed to be in the same aesthetic language as the rest of the video. The boxes in the image are the bounding boxes for a slide (maximum width and maximum height)- a template I used throughout the process of making the video.
 The final paper cut ready for printing using the laser cutter. If you click on the image above to get a larger version, you'll see that each "Mini Slide" (I call them that because they are not the full width of a normal slide due to space reasons) is listed with a code. Each code is something liek A1A[2], which represents the letter associated with the slide (see above notes), then the part number, followed by the duplicate number (as the slides are mirrored, each letter part has a duplicate). I needed to have this so I would be able tot quickly group up each Mini-Slide.
 Thursday was paper cutting day. After I got my vector cut, I carefully detatched them from each other and took them home in a plastic box. While talking with Ryan at the FBE Workshop, I explained how I originally intended to paint my slides, but had given up on that idea because of time. He suggested that I spray paint the model, as it is very quick and strengthens the pieces themselves. I decided, from this advice, to only spray paint the parts cut with the laser cutter, not only to highlight that that is the part of the video cut with the laser cutter, but also to exphasise the "climax" of the video, which is Segment 7. I spray painted them on Thursday evening, and placed double sided take underneath each piece and arranged them into their parts.
 Above is the templates for Segment 2. Segment 2 turned out to probably be the most complex and difficult to figure out segment than any other part video. As I created the templates for this segment, and was about to start cutting them into the shapes they needed to be, I realised I wouldn't have enough time to complete the rest of the video (or the quality of the video would be very unbalanced), so I compromised quite a bit. The site that "grows" out of the title frame (from Segment 1) was originally designed to be the full 16 slides of the slide box, but I changed it to 8 to speed up the process. Various other parts were shortened to also speed up the process. This allowed me to use the templates that were cut for segment 2 for the rest of the video (also compromising the detail of each other segment) without every having to cut any more.
 The same work environment as the image above, but after the entire cutting process and the finished slides had been removed. There were a lot of offcuts and left over templates.
 I then went about photographing the segments one by one. This was a simple process of arranging the slides for a frame, taking a photo, removing that slide and adding in another (of course some parts of segments were more complicated- part 1 of segment 2 [the growth of the site from the title] requires a full 16 different slides per 16 frames). This process was far quicker than the cutting, and went quite smoothly, despite some accidental tripod kicks, which is when the video jumps a little, from my inability to line up the camera again perfectly.
 If the image from the post on Wednesday (Segment 1) could be called the "Before" shot of the work environment, then this is the "After" shot. A lot of slides and pieces of double sided tape everywhere!
Saturday 21st March 2009

 These were notes I wrote last Saturday and were the original notes made for the idea of the assignment. As you can see from the notes, the first thing I did in the process was to listen to the piece of music to help me structure my ideas. By listening the music and breaking it down into "segments", I was able to structure my thoughts into segments as well.
Wednesday 25th March 2009

 These notes were written on the Wednesday to try and structure exactly how I was going to go about creating the video. It was a test of logic for me to think about explactly how many slides would need to be cut in order to do what I wanted. As these notes show, I originally estimated I would need to cut a lot more slides than I did, due to not thinking creatively enough, at the time, about how I would photograph the frames. It was at this point I decided to abandon the use of colour in the video. With the number of slides I was estimating, the workload was unrealistic, and something I could afford to compromise with.
 When creating a "segment" I break them down into 4 parts. Each part is the melody of "Happy Up Here" (The song of my video, click here to see the video) played once. From this, I could sync the video in time with the music with very little effort. When planning the difficult Segment 7, I had to plan when each part of the segment would be shown in relation to each other. Segment 7 spanned 10 slides, but not all at once, so these diagrams in these notes helped me ground myself with what I was actually creating. The diagram in the top right was especially helpful in reminding me what I labelled as what and in which sequence they are shown.
 This was the vector I started to create (for Segment 7) on the evening of Wednesday for the Laser Cutting we had booked for Thursday. Originally (and as can be seen from my storyboard and notes [above]), my idea was to have ornate, asymmetrical flames that would evolve into a tower while licking at the air. I started trying to create this in Illustrator, but realised that such asymmetry would not only take an incredibly long time to do well, but also, may jar with the rest of the video, as symmetry is something that has always been present. I did want the sequence (which was Segment 7) to stand out, but it still needed to be in the same aesthetic language as the rest of the video. The boxes in the image are the bounding boxes for a slide (maximum width and maximum height)- a template I used throughout the process of making the video.
 The final paper cut ready for printing using the laser cutter. If you click on the image above to get a larger version, you'll see that each "Mini Slide" (I call them that because they are not the full width of a normal slide due to space reasons) is listed with a code. Each code is something liek A1A[2], which represents the letter associated with the slide (see above notes), then the part number, followed by the duplicate number (as the slides are mirrored, each letter part has a duplicate). I needed to have this so I would be able tot quickly group up each Mini-Slide.
Thursday 26th March 2009
 Thursday was paper cutting day. After I got my vector cut, I carefully detatched them from each other and took them home in a plastic box. While talking with Ryan at the FBE Workshop, I explained how I originally intended to paint my slides, but had given up on that idea because of time. He suggested that I spray paint the model, as it is very quick and strengthens the pieces themselves. I decided, from this advice, to only spray paint the parts cut with the laser cutter, not only to highlight that that is the part of the video cut with the laser cutter, but also to exphasise the "climax" of the video, which is Segment 7. I spray painted them on Thursday evening, and placed double sided take underneath each piece and arranged them into their parts.
 Above is the templates for Segment 2. Segment 2 turned out to probably be the most complex and difficult to figure out segment than any other part video. As I created the templates for this segment, and was about to start cutting them into the shapes they needed to be, I realised I wouldn't have enough time to complete the rest of the video (or the quality of the video would be very unbalanced), so I compromised quite a bit. The site that "grows" out of the title frame (from Segment 1) was originally designed to be the full 16 slides of the slide box, but I changed it to 8 to speed up the process. Various other parts were shortened to also speed up the process. This allowed me to use the templates that were cut for segment 2 for the rest of the video (also compromising the detail of each other segment) without every having to cut any more.
 The same work environment as the image above, but after the entire cutting process and the finished slides had been removed. There were a lot of offcuts and left over templates.
 I then went about photographing the segments one by one. This was a simple process of arranging the slides for a frame, taking a photo, removing that slide and adding in another (of course some parts of segments were more complicated- part 1 of segment 2 [the growth of the site from the title] requires a full 16 different slides per 16 frames). This process was far quicker than the cutting, and went quite smoothly, despite some accidental tripod kicks, which is when the video jumps a little, from my inability to line up the camera again perfectly.
 If the image from the post on Wednesday (Segment 1) could be called the "Before" shot of the work environment, then this is the "After" shot. A lot of slides and pieces of double sided tape everywhere!
The editing process was very quick due to the careful planning pre-production and during the production process. Using Sony Vegas Movie Studio 9.0 (Trial) it was very easy to import the different parts of segments at different speeds, and stretch out frames to fill a part. Complications did arise with some of the frames (2 frames in Segment 3 had scissors in them, that were quickly covered up using the clone tool in Photoshop). I decided not to alter my raw images as I quite likes the warm light from the photos, and I wanted it to retain a "manual" look in a way. In my opinion, it made the box itself seem more "alive".
Wednesday, March 25, 2009
Segment 1
 The working environment for creating Segment 1.
Segment 1 had been completed and rendered. YouTube seemed to be a bit funny with the sound compression I used, so I don't think I will post using YouTube from now on.
The making of segment 1 went fairly smoothly, with no disasters during the cutting, arranging or photographing, which is good considering this is the last "test" before creating the real model.
As you can see from the video below, Segment 1 is merely the titles of the video. The purpose of creating this test was to see how I could sync the images to the video, and to see it actualise from what had only been in my head for the past few days. Overall, I am very happy with the result, as it is how I intended.
A Name and a Title
 During the brainstorming phase I came up with a number of words to describe my reaction towards the exhaust stack and its place in the site (see blog "Brainstorming"). I decided to pick two words out of that list as my title for my model/stop motion video.
"Embedded" refers to the fact that we can assume how the stack connects vertically down and through the earth under the site. There is a sense that the connections the stack has to the Eastern Distributor tunnel "lock in" the stack to the site.
I chose the word "belonging" because although the exhaust stack is perhaps not the healthiest structure to have in the place of a medical centre, it had a purpose paramount to the site. As I have mentioned in previous posts, without the stack, the ED would not be able to function, and without the ED, the already heavy traffic around the area would get even slower.
I feel this titled fits my video, as it is an exploration of the history of the relationship of the exhaust stack with its site.
Tuesday, March 24, 2009
Colour Tests

These are the colours I am thinking of using for each part of my video of my stop motion model. I was inspired by the Sydney Morning Herald ad that ran last year (which I can't seem to find on YouTube or by any other means), that had a "flip book" style of animation where a figure morphed into another while flickering in different colours.
I hope to attain a similar effect in some of my animation, but overall I would like to use a full spectrum of colour to help underline the points I want to make as well as keeping this assignment in the playful exploration theme, that I am trying to obtain.
Testing the Slides
After creating the box, I made some basic slides and photographed them to see how my idea would work in actuality. The end result is just about how I wanted it to be. I'm sure with slides added with colour, some better composed lighting and timing with the frames, the effect will only get better.
NB: YouTube is having a tendency of cutting my videos short (in this video it is evident by the final 3 frames not showing) which is something to consider in the future videos I make.
NB: YouTube is having a tendency of cutting my videos short (in this video it is evident by the final 3 frames not showing) which is something to consider in the future videos I make.
Building the Box


I created a prototype (and possibly final- depending on time) version of the "slide box" to house the "slides" that will be cut by hand and the laser cutter. I plan to create a short test movie of how the process will work and look.
Monday, March 23, 2009
Storyboarding


 Above are the storyboards for my model/animation. I am a little worried that it is trying to achieve too much, however, after making the slide box itself, I don't this the process of making slide (or photographing them) should take too long, considering the elements themselves aren't complex.
I will have to see how much I can do, and how long it takes me- but I may need to re-evaluate the content if I do need to cut back.
If I would be able to achieve all this, however, I would be very happy. In total, this should go on for approximately 1 minute and 6 seconds.
Thinking Through Music
Throughout the brain storming process, I was listening to a song by a Scandinavian band called Röyksopp titled "Happy Up Here". The beat and the melody to it is something thats very similar to what you'd hear on an iTunes/iPhone/iPod ad.
I have decided to let the music of this song help flow the animation and give it a sense of structure. I fear that without it, the animation would seem bland and hard to follow. The music has helped me pin down the segments from before into an extended 7 segments, that follow certain parts of the piece of music (of which I am only using a small amount of course).
Below is a YouTube video of the song itself (and its music clip!).
Brainstorming
To start the process of creating this complex model/animation, I wanted to storyboard my ideas. I has so many different ideas of what I wanted to convey, but I decided that I wanted it to be a narrative. Then the question was, what do I want to say about the site, the exhaust stack, and the porspect of a health care facility?
I started thinking about the stack and what words would describe it. I came up with:
This narrative will be explored in 5 segments:
I started thinking about the stack and what words would describe it. I came up with:
- Dynamic
- Vertical
- Evolving
- Embedded
- Belonging
- Excavated
- Relationship
- Mutual
- Parasitic
This narrative will be explored in 5 segments:
- We are introduced to the site, and a tower grows and looms in the centre of it, reducing the scale of the site.
- The tower consumes the site and we travel through the "mouth" of the tower as we travel back to understand how this relationship formed.
- On a blank bed of "slides" hexagons appear and line up - representing the built environment that did exist around the site. These hexagon are then "sliced" down their centres- symbolising the creating of the tunnel. Rectilinear forms then cover the wounded hexagons to symbolise how the site adjusts to the changes.
- The box then wipes clean. A series of small hemishperes then "swim" through the slide box, representing the cars that travel down and the importance of the new constrcution. They are followed by a single, extremely large hemisphere that slowly swims through the site- representing the inevitable effect of the cars travelling through. Angular rectilinear forms then built up on the slide box to form 3 towers.
- These towers emit small "smoke puffs" that begin to cluster. They form a large smoke pillar that licks the air with an ornate complexity, but also a sense of danger. This, obviously represents the problem that has occured with these poisonous gases needing to be expelled. This pillar then turns back into the tower from Segment 1- confirming the role of the stack and its importance in the site.
Stop Motion and Me
 After we made the stop motion videos of our models, it got me thinking about the possibilities of a stop motion model. I immediatly got this idea of a "slide box" (see previous post) where one fixed box has a series of slots that slides can slide into, and it being done as an animation would allow for the "slides" to change and move from slot to slot, creating various visual effects.
The more I thought about this idea the more I liked it. It would create a model that wouldn't exist without the animation, however, and presenting it without the animation I estimate would require about 4-6 static models.
On Friday I made these sketches (above) of the various ideas I thought I could use. These ideas included:
- a topographical terrain mapping
- slide "waves" across the slide box
- cutting in on the X axis as opposed to just limiting it the the Y axis
- having objects tilt to represent the camera tilting
- the slides "flipping" to panel, to allow for limited text
The Slide Box

In brainstorming my ideas for a stop motion model, I thought of something I has seen in a TV show called "Dexter", which was a microscope slide box. The intention is to house glass slides in a box, while not allowing them to touch each other to preserve the culture that exists on the slide.
I hope to create something similar to this, but where the slides themselves extrude out of the constraints of the box.
Sony Bravia Rabbits
This is the video we tried to have a look at on Friday, but YouTube wouldn't let us. This is the ad for Sony Bravia, that you may have seen on TV last year. It uses plasticine and stop motion on an extremely large scale to create an amazing effect.
This video first shows the full length ad (90 seconds) followed by a 5 minute "making of".
This video first shows the full length ad (90 seconds) followed by a 5 minute "making of".
Stop Motion Models!
Below is the finished stop motion video of my model being "constructed" and then rotating. Not realising that our models were going to be animated, my model was made to be fixed in place (glue holding the pieces of cardboard in their slots, etc.)
I agree with comments made about this video that the most interesting thing about it is the "contruction" part of the video at the beginning of the hexagons attaching. This has helped me to think about the final project in a very different way.
I have now made a YouTube Channel that has this video, and will have future videos, as well as my Favourites of different videos that have inspired me in this project.
http://www.youtube.com/user/aLIFEefreeman
Contructing the Paper Cut
 Assembled Paper Cut Model
 Contructing the Paper Cut Model
As I got my pieces from Monday's Laser Cutting session, I was a bit lost as to how I was going to contruct these pieces. The large plat squares with rectilinear shapes cut into them seemed useless in helping communicate what I wanted to, do I discarded them.
I decided to form the model all around the "funnell" of square outlines- representing the function of the exhaust stack. The "stirrers" act as the complex mechanisms within the stack, and the hexagon's represent the site itself, and how it is tied in and reliant upon the stack to survive (without the stack, there would be no ED, without the ED, there would be even greater problems with traffic).
Overall, I am fairly happy with the finished outcome (from what I had), but annoyed that I didn't work at devloping the paper cut in the Adobe Illustrator stage- because I think I could achieved far more depth in terms of its communication.
Adobe Illustrator Vector
 The original vector made in photoshop was designed to replicate my skecth. However, I thought that the shapes were so rectilinear, I could have just cut them by hand, so included the circles (which I refer to as my "stirrers") and the hexagons.
Adding these shapes also helped me to think about how I was actually going to put these shapes together in a 3D model.
First Sketch of Paper Cut
 This was the first rough sketch I made for my idea of the paper cut. The original idea was to take adavntage of the many strong rectilinear forms that exist in the building, and attempt to communicate the hidden complexity behind the seemingly simple form. It was aiming to discuss the role of the structure (funnelling out the exhaust from the ED tunnel) by having the square "frames" towards the right of the image).
This idea, however, wasn't how my paper cut came out.
Sunday, March 15, 2009
Serious Games
This is some information about the ABC grant I was talking about in Week 1. At the bottom of this post is the direct link to the PDF, but here are some excerpts from the document.
Basically, how it works is that you come up with an idea for a game, and submit it in the format outlined in the PDF, then you may one of 3 groups/individuals to be selected to attend a Workshop. At the Workshop you develop your ideas with local and international professionals.
The 3 teams also receive $15, 000 to 'consolidate their idea into a Game Design Document' within 2 months of the Workshop.
One of the three teams ideas will be chosen to be put into full production with a grant of $325, 000.
Dates:
APPLICATIONS CLOSE 5pm, Friday 24 April 2009.
Successful projects will be announced in late May 2009.
The Serious Games workshop will take place during June 2009.
Development delivery items will be due in late August 2009.
http://www.abc.net.au/tv/seriousgames/pdf/seriousgames_guidelines.pdf
Games provide a powerful opportunity to communicate with a broad,
contemporary audience, so Screen Australia and ABC TV want to give the
opportunity to a range of media professionals to develop and produce a serious
game.
We are looking for game IDEAS that address issues that may be in the field of
society and culture, health, relationships, history, science, politics or the
environment. The game will explore this topic in an imaginative, creative,
entertaining and innovative way, with a strong game narrative and solid
underlying educative aspect.
The creative collaboration of professionals with complementary expertise can
engender an environment ripe for innovation.
Basically, how it works is that you come up with an idea for a game, and submit it in the format outlined in the PDF, then you may one of 3 groups/individuals to be selected to attend a Workshop. At the Workshop you develop your ideas with local and international professionals.
The 3 teams also receive $15, 000 to 'consolidate their idea into a Game Design Document' within 2 months of the Workshop.
One of the three teams ideas will be chosen to be put into full production with a grant of $325, 000.
Dates:
APPLICATIONS CLOSE 5pm, Friday 24 April 2009.
Successful projects will be announced in late May 2009.
The Serious Games workshop will take place during June 2009.
Development delivery items will be due in late August 2009.
http://www.abc.net.au/tv/seriousgames/pdf/seriousgames_guidelines.pdf
Saturday, March 14, 2009
Electronic Calculator in a Virtual World
Here is the video of the 'Little Big Planet' calculator we were discussing in Week 1. He first shows us how it is used in 'Play' mode, then switches to 'Edit' mode to expose all the switches, wires and pistons he used, so we can roughly see the amount of complexity that goes into creating this seemingly simple device.
The creator had this to say about his creation:
Title: 'Little Big Computer'
Author: 'Upsilandre'
Game: Little Big Planet
The creator had this to say about his creation:
i have made an "electronic" 8bit calculator (not "mechanical" calculator) with the Beta demo of "Little big planet" (a new PS3 game with an editor for create).
it do decimal/binary conversions and it can do Add and Sub.
There are probably more simple solutions for calculator machine but i was more interested by this "electronic" solution for the fun
computation take clearly less that a half second
this calculator use:
- 610 magnetic switches
- 500 Wires
- 430 pistons
- 70 emitters
and others stuff...
Level called "Little Big Calculator"
my PSN is Upsilandre
Title: 'Little Big Computer'
Author: 'Upsilandre'
Game: Little Big Planet
Machinima
I came across this video a few months ago and thought it was an amazing example of Machinima. It uses World of Warcraft but the creator has actually altered the game models themselves to allow more precise movements of the models (not sure exactly how he managed this). A great video whether you have played WoW or not.
I thought this was relevant in understanding the possibilities of games, and how users have used them to achieve a different purpose than they were designed for.
Title: 'Craft of War: BLIND'
Author: 'Percula'
Game: World of Warcraft
Song Details: 'Hide & Seek' by Namie Amuro
If this interests you, I recommend checking out the very successful comedy Machinima 'Red vs Blue' that I came across about 4 years ago. It uses Halo and the creators simply made their characters bob their heads up and down and letter boxed the frame so much as to hide the weapons/health/map/etc (you can still see the cross hairs though).
Title: 'Red vs Blue'
Author: Rooster Teeth (http://rvb.roosterteeth.com/)
Game: Halo
All episodes are available to download for free at the link below.
http://rvb.roosterteeth.com/archive/archive.php?sid=rvb
Subscribe to:
Posts (Atom)